Displaying items by tag: Nesting
Building and erecting Grey Teal nest boxes
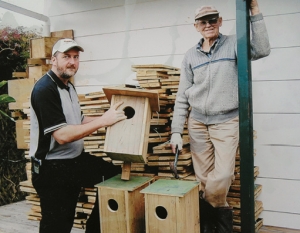
These nest box instructions were first used in an early Flight, and have proved very effective since then. So for the handy men and women among our members here is a new occupation for you over the summer months.
Introduction
Since its inception in New Zealand, Ducks Unlimited has been advocating the provision of nest boxes as a way of increasing the number of Grey Teal in the country. This project known as “Operation Gretel”, was the first project undertaken by DU in New Zealand and has already seen over 900 nest boxes erected in different parts of the country.
As Grey Teal are usually hole nesters, there is a common belief that their numbers in New Zealand are limited by a shortage of nest sites, compared with Australia. Therefore, the provision of artificial nest sites, in the form of boxes, is a potentially powerful management technique for increasing both the number and range of Grey Teal. Probably the most successful example of this is the management of Carolina Wood Duck in North America, however, nest boxes are also used successfully for the management of other species in both North America and Europe. The attached plans cover the construction, mounting and servicing of two different designs of Grey Teal nest box. The front entry box is the type most widely used, however, the alternative side entry may be preferred by some people as it is possibly more weather and predator proof. Its main disadvantages are the extra material, and hence cost, required to build it, and its more complicated fabrication.
The plans for both designs are based on the use of 2400mm x 1200mm sheets of 9mm plywood which is suitably treated for exterior use. For each design there is a cutting plan, to ensure the correct number of components are cut from each sheet, while minimising waste, and an assembly diagram, to illustrate correct overlaps. Thicker plywood may be used for a longer life, however, this will entail some dimesional alterations. Suggestions for mounting each box type are also included.
Construction
The dimesions on the cutting plans are all in millimetres, and are finished sizes. This means that most of the waste shown around the edges of the sheets will be consumed by the thickness of the saw blade multiplied by the number of cuts made. One sheet of plywood will yield enough components to build six front entry boxes or four side entry boxes.
Galvanised flat head nails, or non-corroding screws, should be used to assemble the boxes and for added strength, lengths of 20mm square timber can be used in the corners of the boxes. This will provide something more substantial for the nails and screws to hold onto and will help prevent the ply splitting when nailing or screwing into the edge of a component. To minimise the amount of reinforcing timber needed, it should be used along the top and bottom edges of the two sides on the front entry box, while on the side entry box it should be placed vertically along both edges of the front, and on the back, where the sides join. In both cases allowances will have to be made for the recessed bottom.
The entry hole of the front entry box should be 90-95mm in diameter as anything bigger could allow larger waterfowl to enter the box and evict the Grey Teal. The centre of the hole should be on the cenreline of the front, about 90mm from the top edge. A strip of chicken wirenetting must also be fixed on the inside of the front, from the bottom edge of the entry hole to the bottom of the box. This allows the ducklings to climb out of the box once the female decides to lead them away.
The side entry box is not as deep as the front entry box so it is easier for the ducklings to escape. However, because plywood has a smooth finish to it, a strip of wirenetting should also be fixed on the inside of these boxes as well.
On the assembly diagrams, the boxes are shown with the lids removed. The dashed detail shows the suggested lid overlap of the box’s four sides, which will help keep the box weatherproof. When fitting the lid, which has to be removable, short lengths of the 20mm square timber can be fixed to its underside to fit tightly inside the four vertical sides of the box. The lid can then be be weighted down with something heavy, or be secured with screws.
The bottom of both box designs are fully recessed and holes may be drilled through them to allow the drainage of any water which does manage to get in. If required, the side entry box can be assembled with either a left or right entry be simply rotating the back and swapping the two sides.
Mounting
Boxes should be securely mounted on a pole, with the bottom about 1m above water level. If necessary, allow sufficient clearance for the pond’s water level to rise during floods. Poles should be driven into the bottom of the pond, in open water, clear of overhanging vegetation as weed mats and overhanging branches give predators access to the boxes. At the same time, it is beneficial to locate the boxes in the lee of tall vegetation to provide them with shelter. Boxes can be erected in lines or small groups, however they should not be close than 4-5m as neighbouring birds can provide sufficient disturbance to lead to nest desertion. As a result, two boxes cannot be erected back to back on the same pole.
Boxes can be mounted by simply nailing or screwing them to the pole permanently, however, there are advantages to be gained from mounting boxes in a way that will allow them to be easily removed for servicing. The use of half round poles will also give a flat surface to mount the box on to. Mounts can be made out of 50 x 50mm tanilised timber, such as fence battens. For the front entry box a 230mm length of timber should be fastened within 10mm of the top edge of the back and should be drilled with two vertical holes to carry locating pins. On the pole a second 230mm length of timber should be fastened with its top edge 50mm below the top of the post. This should also be drilled with two vertical holes corresponding to those on the box mounting, however, they should remain blind. A short block should be fastened further down the post with its top edge 340mm below the top of the post. The box can then be mounted by resting it on the top post mounting and dropping long nails through the extended back of the block.
The side entry box can be mounted in a similar way, however, the mounts should be 260mm long and only extend across the back of the main nest box, not the side entry. A different bottom mount will also be needed. Instead of a block, a further 260mm mount should be fastened to the box close to the bottom edge of the back. A second mount should be fitted to the post in such a position that the top box mount fits over the top post mount while the bottom box mount fits tightly under the bottom post mount. Both the top and bottom mounts can then be secured using simple locating pins, as on the front entry box, yet these still allow the box to be easily removed from its post.
Servicing
Grey Teal begin prospecting for nest sites in late May and June, and eggs can be expected from July onwards, so long as water conditions are suitable. Nesting may also continue into December, or even as late as January or February in exceptional years. However, because waterfowl do not carry nesting material to their nesting site, the boxes must be furnished with suitable material, such as dry hay or straw, before nesting season.
Once Grey Teal have finished using the boxes it is usual for Starlings and Mynas to take them over, and as these birds do carry nesting material to their nest site it is common to find a box completely filled with dry grass once they have finished with it. Therefore, the boxes will need to be cleaned out and provisioned with fresh nest material each year. This is best done about May as the Starlings and Mynas should have finished nesting yet the Grey Teal would have started. An annual clean out will also reduce the risk of disease and parasite infestation for the Grey Teal. The bottom of the box should be covered with 50-75mm of nesting material, enough for the female to fashion it into a nest bowl without the eggs having to sit on the bottom of the box.
If all goes well, the boxes will start being used by Grey Teal as soon as they have been erected. However, if pinioned birds are present they will need to be given access to the boxes via a ramp. This can be made simply out of a piece of 100 x 25mm timber either covered with wirenetting, or having shallow cross cuts in it, for the birds to grip on to as they climb up to the box entrance. The ramp should extend down to water level, but remember this could give predators entry to the box as well.
Starling and Myna birds caught interfering with duck nesting
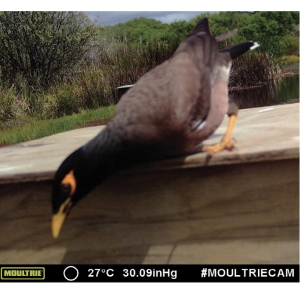
The myna also frequently pulled nesting material from below over the teal eggs to try to bury them so it could take over the box for itself. Once the teal began sitting on the eggs full-time to incubate them, the myna gave up and the teal eventually successfully hatched the whole clutch. Game cameras have invisible infra-red capability and this can tell us what is happening at any hour of the day or night at times and places we could previously only speculate about.
This same problem also exists in the US where wood duck nest box complexes can get taken over by introduced starlings. Researchers have tried all manner of deterrents including mirrors inside the nest boxes and even flashing lights. Neither seems to dissuade the starlings from displacing the wood ducks. Starlings cover up duck eggs with fine grass and similar material. However starlings like to nest in a dark corner of the box. Cutting a 100x100mm hole in the lid and adding a diffuser skylight that transmits 80-89% of light thwarted this desire by lighting up the nest box corners too. The wood ducks however don’t seem to mind this new accessory. This is now being trialled in NZ to see if myna birds are similarly deterred and grey teal not.
When starlings adopt a wood duck nest box, they intimidate and even attack the resident wood duck trying to get back in. Another successful ruse used to defeat the starlings is to use their own biology to best advantage.
This has also been trialled in NZ with native grey teal and our own introduced starlings. Lacking a proper study it might be premature to call it a success, but starlings have certainly used the smaller starling boxes and when they do they have not been found inside the larger teal box. However on one occasion the two species shared the same plain nest box and, a bit like cats trying to avoid fight perhaps, they each looked and faced the other way as they incubated side by side, the starling in the corner, the teal in the middle.
Roof cam
The “roof cam” inside the afore mentioned teal box took no less than 7,587 photos of a wriggly restless grey teal which suggests that the myna bird may have left more than just rubbish. Both mynas and starlings are host to bird mites. As many as 5000 of these can infest a nest box and come out at night to suck the birds blood. Pulling back the nesting material will reveal a grey mass of eggs in corners and the mites themselves will live in creaks in the structure.
The latter can be avoided at box building time by putting PVA glue in all the joints. About $30 worth of quaternary ammonia will make up 32-litres and this actually dissolves the mites if any are present. So this might be a useful thing to do when servicing nest boxes, (they need old nesting material removed and new added each year. (This also, incidentally, stops parasite build up in the nest).
Sounds like a great MSc study to me as grey teal do not readily desert nests so obtaining data should be straight forward. When grey teal nest boxes are serviced each year in March/April, the sheer amount of rubbish left in them by mynas and to a lessor extent starlings is hard to credit and often more than one clutch of grey teal eggs lies buried somewhere in the middle.
So sorting out starling and myna problems can potentially make grey teal nest box complexes even more productive than currently.
A new article on best practice for grey teal nest box construction and maintenance has recently been added to the NZ Fish & Game website.
By John Dyer,
Auckland/Waikato Fish & Game Council
Lots of babies at Pukaha Mt Bruce
The Wairarapa breeding programme is going very well at Pukaha Mt Bruce. The Shore Plover programme has hatched 22 healthy chicks so far this year with five pairs now sitting on their third clutch.
The two pair of pateke are nesting again having so far successfully reared 12 ducklings between them.
The whio pair has three ducklings and there are three juvenile kiwi in the creche nearly ready for release as well as a kiwi chick hatched on Christmas Eve and one kiwi egg externally pipped and will hatch any day.
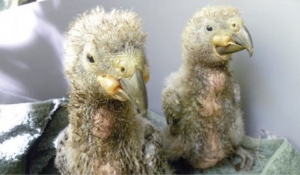
One red-crowned kakariki pair have three chicks to look after while another pair are waiting for their five eggs to hatch.
Wild kaka have this year utilised three of the nesting boxes with one pair already fledged and another three chicks not far behind.
Urban bittern chicks
Urban bittern chicks get into strife
Now, if I was to ask how many of you have seen a juvenile bittern or a bittern nest, I think it’d be safe to assume that most of you haven’t. And that’s saying a lot given that you are all wetland enthusiasts who regularly work and play in these kind of habitats.
So when we got a report that a female bittern chick had been found wandering along a road in Christchurch you can imagine our surprise. What was one of the most cryptic and secretive wetland birds doing on a road in the city? And the surprises didn’t end there – a few weeks later a second female bittern chick walked into a residential garage, only 500m from the location where the first bittern was found.
There had to be a nest nearby – but where?
Both bitterns were very skinny and clearly dehydrated. They were taken to bird rehabilitator Jackie Stevenson, who set about trying to fatten them up and get them feeding for themselves. In the meantime, local ornithologist Peter Langlands set about trying to find their nest.
Now this is no easy task. Bittern nests are tricky to find. A broody female bittern will build her nest by bending blades of raupo to form a floating platform that is perfectly hidden in the thick vegetation. And she’s not necessarily alone. Male bitterns can have multiple females, which all appear to nest within close proximity to each other.
Once a mother-to-be is happy with her nest she’ll lay between 3 and 5 eggs before starting to incubate. She hatches the eggs and rears the chicks alone, apparently chasing the male away if he tries to get too close. While incubating, she’s almost impossible to see as her streaked plumage blends perfectly in with the surrounding vegetation. Occasionally she’ll slip silently off the nest to feed, but only momentarily as this leaves her eggs vulnerable to predators.
After about 25 days, her eggs will hatch to produce little fluffy chicks with Albert Einstein inspired hairdo’s. These fuzz balls, emerge as masters of disguise straight from the eggs, and will adopt a perfect ‘freeze pose’ that looks similar to that of the adults if they are disturbed. Chicks fledge at about seven weeks old. However, there is some suggestion that they may start wandering from the nest as early as two weeks old - which is perhaps how one chick ended up on a city road and the other in a household garage.
Midway between the locations where these two birds were found lies Travis wetland, a 120 hectare swamp complex that has been restored over the last 15 years by the Travis wetland trust and the Christchurch council. It is the most likely place where these two birds came from. As it happens Travis is a noteworthy place, with an interesting history. In the 1960’s, this beautiful wetland was under threat from developers, who wanted to convert it to a residential area. Luckily, the locals had other ideas. They realised the importance of the site’s natural biodiversity, and argued long and hard for its protection. After a long battle that involved a petition signed by almost 7000 people, biodiversity won out, and in 1997 the site became a natural heritage park.
And lucky for bitterns that it did!
Since then, these two bitterns have done well in captivity and we were able to release them over the festive season - one along the Waimakariri river and the other at Harts Creeks. We attached radio transmitters to both bitterns, one of which was kindly funded by Ducks Unlimited. Both of these birds will be tracked regularly by local enthusiasts and, as female survival and breeding success is the secret to saving a species in decline, and these birds are the only females to carry transmitters at the moment - the information we gain will be essential for saving the species.
Emma Williams
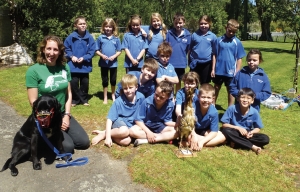
And thanks to Gill Lundie for organising the school visit.
Spoonbills at Boggy Pond and surrounds
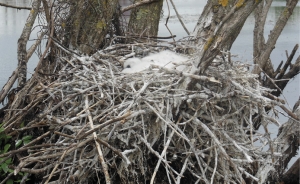
The photo is of spoonbill chicks in a nest early this year. The nest itself is a pretty loose affair of sticks placed in the base of a dead willow tree and surrounded by open water on all sides. As the chicks age the nest becomes a lot whiter, the result of droppings from both the chicks and their parents.
This was the first record of spoonbills nesting at Boggy Pond and only the second for Wairarapa.
They have been seen more often in the wider area over the past few years with the increased area of shallow wetland created by DU’s Wairio restoration project likely to be providing a good reliable food source.
I think, also, that the predator control in the area has been a big part of supporting these nests once they start and giving the youngsters a decent chance of fledging.
We hope that this is the first of many!
Earlier in the year a team took the canoe to chase and spray purple loosestrife.
On the way out we noted a big flock of spoonbills at the northern end of the lagoon and on the way back we came across some nests in the bases of sprayed willows.
We didn’t approach too closely, but through the telephoto it looked like two chicks at least in each.
It was quite a shock to come across these, a pleasant one too, as you’d imagine. This is the second confirmed nesting site at Wairarapa Moana.
We plan to follow up the loosestrife work and will check on these chicks and have a look over a wider area to see if there are more.
I think this is a result of the combination of willow spraying opening up the lagoon and creating the right conditions for nest building and the pest control keeping the nests alive instead of providing food for hungry mammals.
Tony Silbery
Kaiarahi- Koiora Rereketanga (Ranger, biodiversity) DoC.
A duck in spring - in Canada
Each spring, Canadians herald the sights and sounds of waterfowl as they flock to their nesting grounds. But after their long trips, life for our feathered friends isn’t easy. Ducks – especially females – undergo arduous physical and biological processes before, during and after their journeys. And once here, most hens have one shot to raise a brood.
It’s early June on the Saskatchewan prairies. A slight breeze gives her wings a lift as she circles over a patch of native grassland next to a shallow pond. She decides to land in a small clearing, then walks into the grassy cover. It’s the third spot she’s scouted. She feels safe here.
In the coming days, this blue-winged teal hen will construct a nest with nearby vegetation and line it with down plucked from her breast. She’ll feed on invertebrates to build her energy for an important role: producing a brood.
It’s no easy gig. She’ll need all the energy she has to give.
When male and female waterfowl prepare for their journey from their southern wintering grounds northwards to Canada, they do so in similar ways. The process differs between the sexes once they arrive. David Howerter, PhD, director of national conservation operations at Ducks Unlimited Canada (DUC) explains how, and why ducks do what they do – before and when they get here.
A shared experience: preparing for migration
Feeling restless – Ever wonder what pushes migratory waterfowl to bid adieu to their warm winter homes?
It’s a physiological process called zugunruhe (pronounced: zoo-gun-roo). This German term refers to the restlessness birds experience as migration nears. Zugunruhe is triggered by the endocrine system (a collection of glands that release hormones into their blood stream) in response to longer daylight hours. “As it gets closer to the time for these birds to migrate they become increasingly active,” says Howerter. “They’ll spend more time flying and their movements will begin to orient in the direction they intend to migrate.”
No exceptions – Zugunruhe impacts migratory waterfowl wintering close to the equator, where daylight hours remain consistent, year-round. This may be a result of evolutionary hangover from when the species had a different distribution, or because of the changing angle of the sun.
Packing on the pounds – “Before ducks begin their journey north, they’ll go through a phase biologists refer to as hyperphagia, where they’ll spend a lot of their days consuming calories,” explains Howerter. “This is done to prepare for their long trip.” Like zugunruhe, hyperphagia’s also triggered by hormonal changes, influenced by changing daylight hours.
Growing closer – Migratory waterfowl can only procreate from spring until late summer. This is because in the “off-season” their reproductive organs shrink, making it easier to fly over long distances. As birds close in on their breeding grounds, their endocrine system releases hormones that stimulate their reproductive organs to grow larger again in anticipation of breeding.
It’s all about her: producing a clutch
Once waterfowl arrive at nesting sites, the male-female experience begins to diverge. “Once they have fertilised the eggs and the hen is incubating, the drakes will take off. Often they’ll go further north, to the boreal forest,” says Howerter.
Meanwhile, the hens prepare for one of the most difficult processes they’ll go through in their lifetime: producing a clutch of eggs.
Size matters – How waterfowl behave once they arrive at the nesting site depends on whether they’re capital or income breeders. “Capital” breeders are large-bodied ducks that can store enough energy (calories) to migrate thousands of kilometres and arrive ready to lay a clutch of eggs, and incubate them for about 30 days. One example of a capital breeder is the common eider, which averages between two and six pounds.
“Income” breeders like the far smaller blue-winged teal (weighing in at 400 grams) are unable to sustain the same kind of fuel reserves. When they arrive at the nesting grounds, they’re looking for protein- and calcium-rich foods, like invertebrates, that provide the nutrients they need to produce a clutch of eggs
Medium-size waterfowl like mallards fall somewhere between capital and income breeders. “Birds of average size usually have enough nutrients to initiate the first clutch of eggs, but they don’t have enough reserves to re-nest,” says Howerter. However, some duck species (like mallards, which are persistent re-nesters) will produce a second or third clutch if their first one is unsuccessful.
Nesting is natural – Birds, like people, experience the urge to nest before they welcome offspring into the world. Expectant bird and human parents alike can trace this feeling to the hormone prolactin. Prolactin is released into the blood stream by the pituitary gland, found at the base of the brain.
Laying a clutch of eggs – A hen’s pituitary gland will also release two hormones that stimulate egg production: follicle-stimulating hormone and luteinizing hormone. They trigger ovulation. Once a duck begins to ovulate, a drake can fertilize her egg – then things begin to take shape. “Once the ovum is fertilised the egg starts to develop.
The yolk provides nutrients to the developing embryo and albumen (egg white) is deposited around it, followed by the shell. About seven days later, the hen will lay an egg,” says Howerter.
A blue-winged teal hen will lay between six to 14 eggs, provided she has the energy required to develop them. “Producing a clutch is very energetically expensive,” says Howerter. “In humans, it can be compared to giving birth to an eight-pound baby once a day for nine to 10 days.”
Sitting still – Once a duck has laid her eggs, she will spend nearly one month incubating them. While some ducks, like common eiders, will stay on their nest nearly continuously, other birds take more frequent breaks to eat. “But even they will lose roughly 30 per cent of their body weight,” says Howerter. In some cases, hens may abandon their clutch if conditions become unfavourable (bad weather, predators, disease).
Crack! – The eggs have hatched. Finally, mom can focus on relaxing and refueling, right? “Not exactly,” says Howerter. Instead, she’ll help her ducklings find food high in protein and calcium, required for muscle and skeletal development. While ducklings are precocial (mobile after hatching), they still need help to find suitable habitat and food.
Bidding farewell – After 30 to 40 days, many hens will leave their broods to prepare for moulting (the process in which ducks lose their flight feathers). “The ducklings are on their own after that,” says Howerter, noting at this point young waterfowl are able to source their own food. At a month old, ducklings are also faster and stronger, making them far more difficult for predators like foxes, raccoons, red-tailed hawks and mink to catch and eat.
Back amidst the grasses, the blue-winged teal hen has hatched a healthy brood of ducklings and led them to the nearby wetland. In future years, these ducklings will return to the prairie landscape to produce their own offspring and repeat this fascinating but strenuous process of duck-rearing.
Continuing that cycle depends on a key ingredient, says Howerter. “Good habitat across Canada’s waterfowl breeding grounds is essential to overcoming the many challenges of successful reproduction for returning birds.”
Healthy and plentiful habitat. It’s the best welcome mat we can roll out for waterfowl every spring.
Julielee Stitt
Communications coordinator for Ducks Unlimited Canada.